Showing posts with label OIM. Show all posts

Tuesday, March 13, 2018

Oracle Identity Manager(OIM) 12c New Features

                          Oracle Identity Manager(OIM) 12c New Features


In this blog we are going to see some new features introduced in Oracle Identity manager 12C.

From my search, I found there is not much major changes from UI level.

End user experience will be same for access request catalog and approval/ certification.

1. Oracle Identity Governance 12c infrastructure requires below components.
    Oracle database (11.2.0.4, any 12c)
    jdk1.8
    WebLogic 12.2.1.3.0
    SOA 12.2.1.3.0
    OIG 12.1.2.3.0
           
2. RCU (Repository Creation Utility) is in-built and can be run from /u03/oracle_common/bin.

3. OIM 12c finally support encryption of database. During creation of OIM users in database,
    RCU can encrypt database table-space.
    TDE (Transparent Data Encryption) option must be enabled in Oracle 12c database.
    TDE allow application to encrypt the table-space using secret key.
    Data is transparently decrypted for database users and applications that access this data.
    Database users and applications do not need to be aware that the data they are accessing
     is stored  in encrypted form.
    If the TDE is enabled in Oracle 12c database, RCU will automatically provide you an 
    option to make OIM table-space encrypted.

4. If you do not have DBA privilege, then you can create a script for DBA to run.
    Once DBA completed running the RCU generated scripts, you can run the
    post process configuration.
    This is very helpful where Database is managed by different administrative team.
5. OIM 12c is now having Application Onboarding capability through GUI.
    It will allow you to create and manage applications, templates, and instances of applications
    , and clone applications.
   This will faster the on-boarding process of applications into OIM.
6.Access Policy can be created and managed from the Manage tab in Identity Self Service
  In OIM12C By enabling and by setting XL.AllowRoleHierarchicalPolicyEval system property to TRUE
  You can achieve Inheriting the access granted via access policies from the parent role to child role 
7.In OIM 11gR2 PS3, single certifier was supported in the certification workflow
   From OIM 12c supports group of certifiers for Application Instance, Entitlement,
   Role and User certification.
8. In above screenshot as we can able to see OIM 12c introduces custom reviewer
    option in certification.

    It is applicable for Identity certification. Custom reviewer for certifications can 
    be specified by  defining certification rules in the 
    CERT_CUSTOM_ACCESS_REVIEWERS table.

    The advantage of above feature is, we can now assign certification request based on a rule
    defined for custom reviewer.

9. OIM 12c can Limit the entitlement-assignments, Role-assignment and Application-assignment
     to certify for each user option for creating a user certification definition.
     For example, while identity certification assigned to reviewer, only the selected roles,
     selected entitlements and selected Application instances will be visible for certification.
     In this way we can remove the birth rights for being certified.

9.We can publish multiple sandboxes in bulk and in a specified sequence using CSV file.


10.In OIM 12c, From Mange Connector you can define your new connectors from 
      all the available components.
      Below images shows, which allow you to choose components and create your 
      new connector inside OIM.
11. Below is new interface for deployment manager for import and export any new
     Development,Testing or Migration.


Feel free to drop your comments.
Regards, 
Aditya.

Sunday, March 20, 2016

How to configure Disconnected Resource in OIM PS3


Disconnected Resource

Disconnected resources are targets for which there is no connector. Therefore, the provisioning fulfillment for disconnected resources is not automated, but manual.
In earlier releases of Oracle Identity Manager, disconnected provisioning is not supported as a first class use case, it is supported by using manual tasks in the provisioning process. This approach has a number of limitations, which are taken care in Disconnected Resources model.
 In Oracle Identity Manager 11g Release 2 (11.1.2.3.0), disconnected resources are an enhanced configuration for manual provisioning that leverage SOA integration to provide higher flexibility and configurability of the manual provisioning workflow
Creating a Disconnected Application Instance
Log in to Oracle Identity System Administration


Create and activate a sandbox

  1.  Click on Sandbox and click on the Create link
  2.  Provide the details of Sandbox Name and Sandbox Description
  3.  By Default the activate Sandbox is checked
  4.  Save and Close


In the left pane, under Configuration, click Application Instances. The Application Instances page is displayed

When Click on Application Instance, it would display the below screen


From the Actions menu, select Create. Alternatively, click Create on the toolbar. The Create Application Instance page is displayed.


Enter the Name, Display Name, Description and check the Disconnected checkbox
Click Save, and then click OK on the information dialog box. The application instance is created, and the details of the application instance is displayed.


The UI form for the disconnected resource is automatically created and set, click Apply.


Publish the sandbox.


In addition to the application instance, in the back end, the following provisioning artifacts are automatically created
Resource Object Of Type Disconnected
IT Resource Type with following parameters
  1. Configuration Lookup
  2. Connector Server Name
  3. Identity Gateway Name         
IT resource of type definition
Parent process form with the following fields:
  • Account ID
  • Password
  • Account login
  • IT resource
Process definition with workflows for the following operations:
  • Provision Account
  • Enable Account
  • Disable Account
  • Revoke Account
  • Modify Account Attributes
Adapters
  • Manual Provisioning
  • Manual Entitlement Provisioning
From the System Administration UI, search for schedule job called "Catalog Synchronization Job" and execute it

The Application Instance available to request from catalog in the Identity Console

To cross check and request for self or other then click on Request Access
Make sure SOA Server is running and request the application instance


---Nagaraju Gorrepati


Saturday, March 19, 2016

How to add a custom attribute to create user page in OIM PS3


When you create a UDF, it is created only in the back-end, and is not available in the page for use on which you want it to be displayed.

Note:
·        Adding a custom attribute is always in relation to one of the following entities: User, Organization, Role, or Catalog.
·        When catalog UDFs are customized to show in the first page of the Create Role wizard, they are also shown in the summary page of the wizard. But when role UDFs are customized to show in first page of the Create Role wizard, they are not shown in the summary page of the wizard. The summary page must be separately customized for these role UDFs to be displayed.

To display a UDF in a page in Oracle Identity Self Service

Creating Custom UDF

Log in to Oracle Identity System Administration.

Create and activate a sandbox


Click the component under System Entities on the left navigation pane of Identity System Administration
In the Custom section of the Fields tab, click the Create icon. The Select Field Type dialog box is display


Select a field type you want to create. The available field types are:
  • Text: Select this option to create a text field.
  • Number: Select this option to create a numeric field.
  • Checkbox: Select this option to create a checkbox field.
  • Date: Select this option to create a date type field.
  • Lookup: Select this option to create a lookup field in which users can search and select the value. 
The Field Type selected is Text in this example and click on OK


Provide the new user defined filed details and Click on Save and Close. 
  • Display name : Director
           The custom field label that is displayed in the form
  •  Display Width : Director
The display width in characters. If you do not specify a value for this field, then the length of the field is taken as default.
  • Searchable : Checked
  • Maximum Length - The maximum length of the field in character

The UDF is added to User form and close Manage User 

Go back to Sandbox and Publish the Sandbox. Take the export of the sandbox for further use.


After adding a UDF through the User form, logout of both Oracle Identity System Administration and Oracle Identity Self Service, and then login again to be able to see the newly added UDF and use it for customization.

Adding UDF on Create User Form

     Log in to Oracle Identity Self Service as the system administrator

          Create and activate a sandbox
       To do so, Click on Create and Provide the sandbox name and Descrption
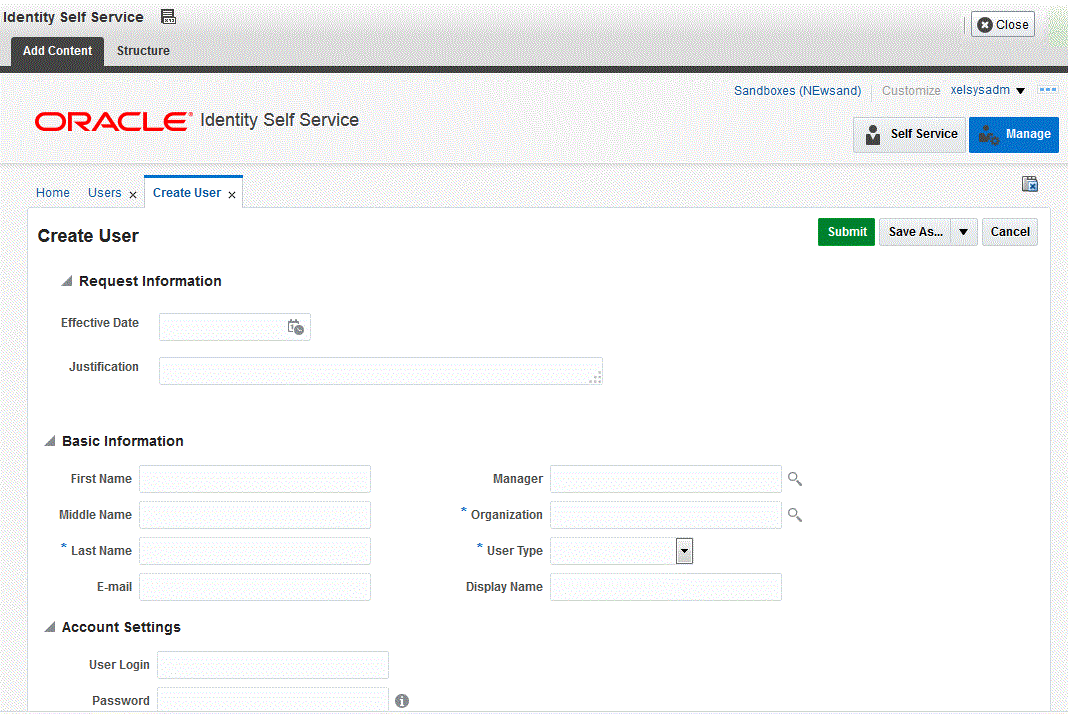
Click Manage. The Home tab displays the different Manage option. Click Users. The Manage Users page is displayed 
From the Actions menu, select Create. Alternatively, you can click Create on the toolbar. The Create User page is displayed with input fields for user profile attributes 

Click Customize at the upper right corner of the page to open Web Center Composer

Enter values for all mandatory fields


Select Structure tab
Select the section of the page on which you want to add the UDF 

In the Confirm Task Flow Edit dialog box, click Edit to confirm the edit task. The corresponding ADF component in the object tree is selected 
Select the panelFormLayout component, and click the Add icon. The Add Content dialog box is displayed.

 Click on Add icon and Add Content dialog box is displayed


Depending on the area or entity  the UDF is added then select the Data Component and View object

For User entity, given some Data Component and View Object


User
Create User
Data Component - Catalog
userVO

Modify User
Data Component - Catalog
userVO

Search Users
Data Component - Manage Users
UserVO1

View User Details
Data Component - Manage Users
UserVO1

My Information
Data Component - My Information
UserVO1

New User Registration
Data Component - User Registration
UserVO1


In this example, i am adding the custom attribute on Create User Form so i used Data Component Catalog and ViewObect userVO


 Scroll to find the UDF that you added and click Add. If the UDF is not displayed, then refresh the content by clicking the Refresh icon at the top right hand corner of the dialog box.
  Depending on the custom attribute that you created in creating Custom attributes section and the type of UDF that you want to display, select one of the following items from the menu:
For a UDF of Text or Number type:
a.      ADF Output Text
b.     ADF Output Text w/Label
c.      ADF Output Formatted
d.     ADF Output Formatted w/Label
e.      ADF Input Text
f.      ADF Input Text w/Label
g.     ADF Label
h.     ADF Readonly Input Text w/Label
i.       ADF Table Column
For a UDF of Checkbox type:
j.       ADF Select Boolean Checkbox
k.     ADF Table Column
For a UDF of Date type:
l.       ADF Input Date w/Label
m.   ADF Table Column
For a UDF of Lookup type:
n.     ADF Input List Of Value (select only for searchable PickList)  
o.     ADF Select One Choice (select only for non-searchable PickList; this option is not visible for a searchable PickList for which you must select ADF Input List of Value)
p.     ADF Table Column (select when adding a column within an af:table)
For example, if you have created a UDF of Text type, then select ADF Input Text w/Label
  Click Close to close the Add Content dialog box.
    
From the object tree on the Editing Page, select the UDF on the page, and click the Show properties icon. The Component Properties page is displayed.
On the Display Options tab:
  Select Auto Submit.
    If you have added the UDF on the user form, then in the Value Change Listener field, enter
         #{pageFlowScope.cartDetailStateBean.attributeValueChangedListener}.
If you have added the UDF on a form other than the user form, then copy the value of the Value Change Listener field from any of the existing fields on the form and paste it as the value of the Value Change Listener field for the newly added UDF
Here are some more properties that you can add based on requirement
 If you want to mark this attribute as mandatory, then change the Required and Show Required properties to true. To set the Show Required property, select the Show Required option. In the Required field, select Expression Editor, and in the Expression Editor field, enter the value as true.
 If you want to display this attribute as read-only, then select the checkbox for the Read Only property.
If you want to bind this attribute to a custom-managed bean method, then change the Value property.
The custom-managed bean method must include a call to the original method binding. For more information
   Click OK.
    Click Close to leave customization mode.
 It is recommended that you export the sandbox, in case if you intend to move the change from test to production environment. 
Publish the sandbox. For detailed instructions on publishing a sandbox,
Remove UDF 
To remove a UDF, you can use the customization mode to open the WebCenter Composer. In the customization mode, select the component or UDF that you want to remove, and then delete it or set the rendered property on that UDF to false.
----Nagaraju Gorrepati